ParaView Installations on Tetralith & Sigma
ParaView is an open-source, multi-platform data analysis and visualization application. ParaView users can quickly build visualizations to analyze their data using qualitative and quantitative techniques. The data exploration can be done interactively in 3D or programmatically using ParaViews batch processing capabilities.
ParaView was developed to analyze extremely large datasets using distributed memory computing resources. It can be run on supercomputers to analyze datasets of exascale size as well as on laptops for smaller data.
| Version | NSC Module | Version Info |
|---|---|---|
| 5.11.2 | ParaView/5.11.2-hpc1-bdist | regular, interactive version with GUI |
| 5.11.2 | ParaView/5.11.2-osmesa-hpc1-bdist | special version for batch jobs, without GUI |
The specification osmesa refers to offscreen rendering using mesa (mesa=software rendering, no GPU acceleration). Offscreen rendering means, that no X-terminal will be opened. It is intended for batch processing without any graphical user interface.
Load the paraview module corresponding to the version you want to use, e.g
module load ParaView/5.11.2-hpc1-bdist
This will add the paraview application to your search path.
The following table summarizes how to start ParaView with GPU or software (mesa) rendering.
| Rendering | ParaView Version | Command |
|---|---|---|
| GPU | 5.11.2-hpc1-bdist | vglrun paraview |
| mesa | 5.11.2-hpc1-bdist | paraview |
When running the ParaView GUI, NSC recommends using ThinLinc to access Tetralith. For more information on how to use ThinLinc, please see: Running graphical applications using ThinLinc
For complex tasks, ParaView offers the possibility to run python scripts. If you want to run python scripts in batch mode, without running the graphical user interface, you have to use a special ParaView version. This version is denoted as “osmesa”. OSMesa means “off-screen mesa”. This version does not support an interactive GUI, but it is intended for batch mode operations. The regular ParaView version does not work in batch mode, as it expects an interactive graphical user interface.
Load the correct ParaView module for batch jobs:
module load ParaView/5.11.2-osmesa-hpc1-bdist
Call your python script, using the pvbatch command:
mpprun pvbatch <your python script.py>
In this case, you do not need the option –use-offscreen-rendering, as it is a special ParaView version.
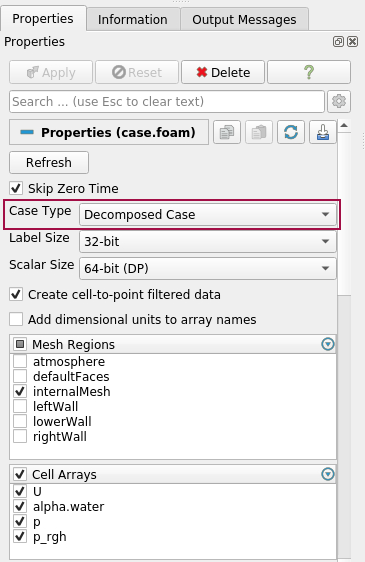
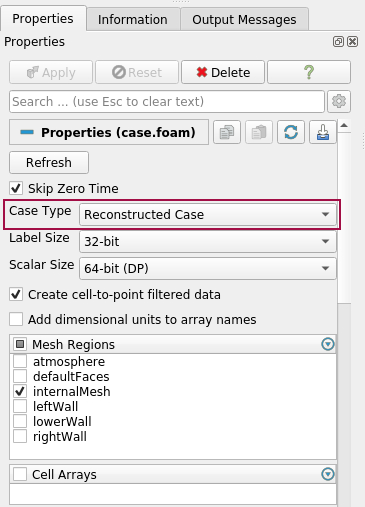
ParaView needs a *.foam file in your OpenFOAM case directory, which indicates that the data is saved in the OpenFOAM format, e.g. case.foam. Depending if your data is saved as a decomposed case, or a reconstructed case, you have to choose the correct Case Type, when opening the file case.foam: Decomposed Case or Reconstructed Case. If you try to read your decomposed data with Case Type = Reconstructed Case, then the field Cell Arrays will be empty. The solution data will not be loaded, due to the wrong Case Type.
| OpenFOAM: Decomposed Case | OpenFOAM: Reconstructed Case |
 |
 |
Choose your variables: Under Cell Arrays, you can select the variables that you want to load. For large datasets, it is recommended only to load the necessary variables. ParaView loads your data, after you have clicked “Apply”.
Collated file format: OpenFOAM also offers the collated file format, that has been introduced in OpenFOAM 7 and OpenFOAM v1712. It reduces the number of files for parallel computations. It seems that ParaView does not support the collated file format so far. You probably have to convert it into a different format to visualize your data with ParaView.
ParaView includes a utility to record your ParaView commands and automatically generate Python scripts. The recorded Python script can be saved, edited and executed by ParaView. This way you can automate recurring tasks, or embed the Python script into more complex work flows.
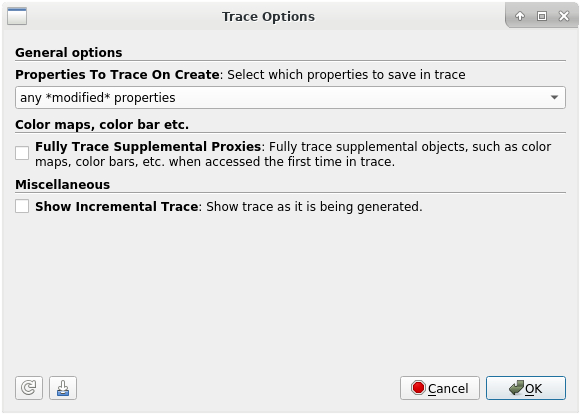
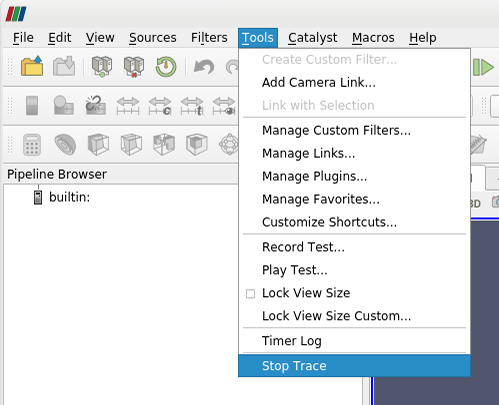
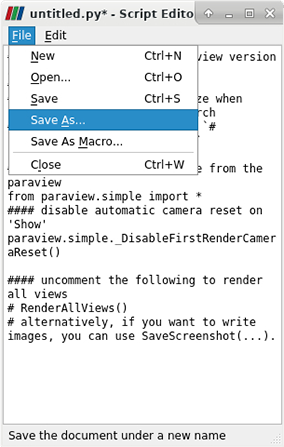
To record your ParaView session, you have to start a so called Trace. In the top menu, select Tools > Start Trace. You will be prompted to select your trace options. Under “Properties To Trace On Create” you can choose “any modified properties”. After pressing “ok”, all steps of your current ParaView session will be recorded. To stop your recording, go to the top menu and select Tools > Stop Trace. A new window will open, that includes the recorded Python script. In this new window you can save the script by selecting File > Save As…
The following table shows the different ParaView menus to start, stop and save the Python trace file:
>> ParaView Menus: Trace File (click for details)
| | | | :---------------------------------------------: | :---------------------------------------------: | | **Start Trace** | **Trace Options** | |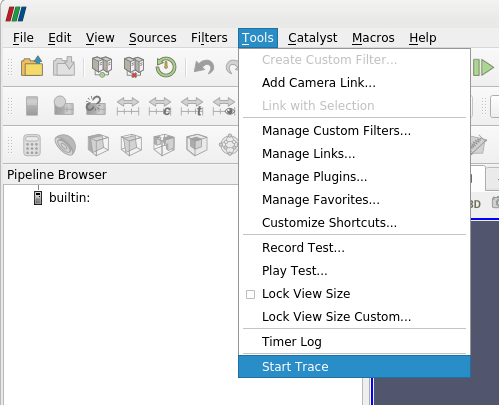 |
|  |
| **Stop Trace** | **Save Trace** |
|
|
| **Stop Trace** | **Save Trace** |
|  |
|  |
|
Python trace file: How to adjust the list of variables
The Python trace file contains a list of variables, that ParaView reads from disk:
casefoam.CellArrays = ['T', 'U', 'p' ...]
If you did not adjust Cell Arrays, when opening your file in ParaView, the list may contain variables that you do not need for your actual visualization. This means, ParaView requires more memory to store all variables and longer time to read the variables from disk than necessary. This is particularly important when reading large data sets or if you want to make animations with a large number of timesteps/images. We recommend to modify the field CellArrays, so that it only contains the required variables. For example, if you only want to visualize the pressure ‘p’, then you can modify the Python script as following:
#casefoam.CellArrays = ['T', 'U', 'p' ...]
casefoam.CellArrays = ['p']
here we commented (#) the original variable declaration and we added a new variable declaration that only contains the variable ‘p’.
Basic Animation Workflow
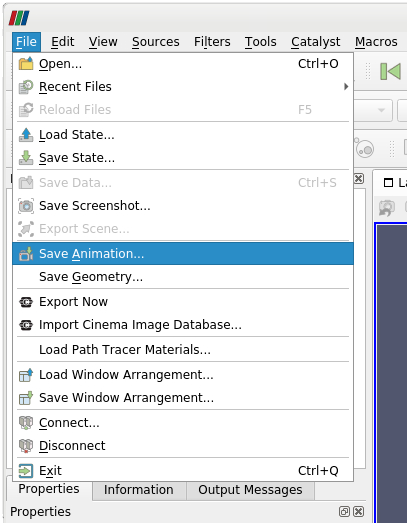
To create an animation of time dependent data, select in the main menu File > Save Animation. A new dialog box will allow you to specify the file name of the animation. We want to export each time step as an individual image. Therefore, we typically choose the png-image format. The individual frame number for each time step will be automatically added to your file name when the animation is created.
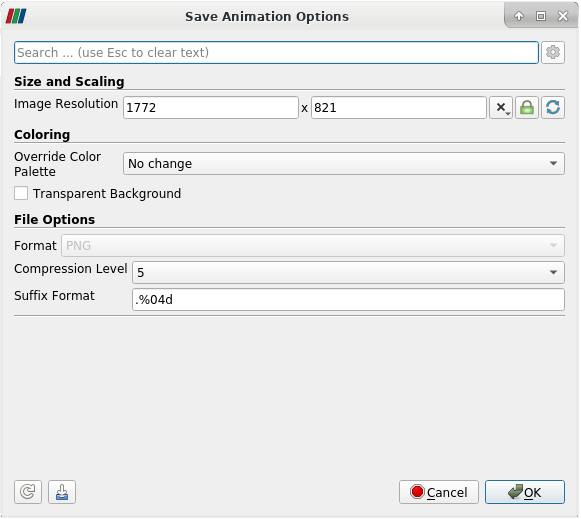
Next, the dialog box Save Animation Options will appear. By default, it will show the standard options to export an animation that contains all timesteps. This is the straight forward way to create an animation. For each timestep, ParaView reads your data from hard disk, creates the output image, and saves the image to disk.
| Save Animation | Save Animation Options: Basic |
 |
 |
Advanced Animation Workflow
If you have large datasets and many timesteps, the basic animation workflow may take some time. It can take up to several hours, dependig on your data. Next, we will discuss how to create animations in parallel, running several instances of ParaView simultaneously.
Basic concept
To create animations in parallel, we record all steps of the visualization work flow as well as all steps to save the animation in a Python trace file. The recorded Python script serves as a basic template. We are then going to execute several instances of ParaView in batch mode. Each instance of ParaView will render a different range of timesteps. This way, we have a parallel workflow. Running multiple instances of ParaView, as well as the adjustment of the basic template to accomodate different time steps is automated by a script.
How to record the Python trace file
- Start recording your ParaView session, as explained in the section "How to record a Python trace file"
- Open your data file and visualize your data according to your needs
-
Save your animation in a similar way as described in the basic animation workflow
- Do not save the complete range of timesteps, but only the first animation frame
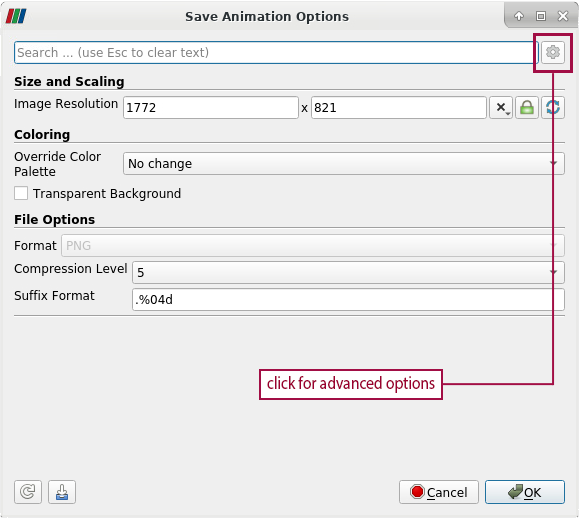
- To change the number of animation frames, open the advanced options in the Save Animation Options dialogue. To access the advanced options, click on the gear in the upper right corner of the Save Animation Options dialogue
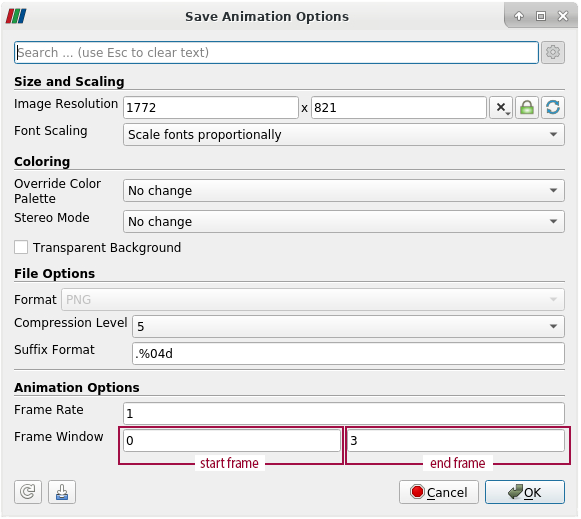
- In the section Animation Options, Frame Window represents the start frame and the end frame of the animation
- Example: Having 4 timesteps in total, the start frame is 0 and the end frame is 3. The numbering of frames always starts at 0. We only want to export the first frame, but not the complete animation. Therefore we change the end frame to 0 as well. Click "ok", to save one frame of the animation
 |
|  |
|
- After saving your animation, you should have an image of the first frame, e.g. test_0000.png. You can view the image e.g. with xview <image>, which is available on the login nodes, but not on compute nodes.
- Stop the recording: Tools > Stop Trace. You have created a Python trace file, e.g. animation.py
- Next, you should inspect the list of variables CellArrays in the Python trace file, as described in the section "Python trace file: How to adjust the list of variables". If CellArrays contains too many unused variables, you should adjust the list accordingly.
- The Python trace file contains the path, where the images will be saved. The command is called SaveAnimation, which contains the absolute path of the image file. It is a good idea to save the images in a separate subdirectory, e.g. images. The directory already has to exist before you run the script.
How to execute the Python trace file in parallel
Next, we want to execute the Python trace file with ParaView. We are going to launch several instances of ParaView, where each instance processes a different range of animation frames. We provide the following scripts that do the parallel processing for you:
| Download | Description |
|---|---|
| Animation Script, interactive | Standard bash script that can be executed in an interactive session |
| Animation Script, slurm batch script | Slurm batch script, submit: sbatch make_paraview_animation_slurm.sh |
How to adjust the script
You have to adjust the script according to the number of animation frames and the name of your Python trace file. The relevant parameter can be found in the Parameter Section, as shown in the following snippet of the script:
#!/bin/bash
module load ParaView/5.11.2-osmesa-hpc1-bdist

# --- Parameter Section --------------------------------

# Start frame, End frame of the animation (numbering starts at frame=0)
FRAME_START=0
FRAME_END=3

# NUM_TASKS=number : use a prescribed number of parallel tasks
# NUM_TASKS=auto   : automatically choose the number of parallel tasks,
#                    according to the available memory (recommended)
NUM_TASKS=auto

# Name of the recorded Paraview trace file/Python script
PARAVIEW_PYTHON_SCRIPT="animation.py"

# --- End of Parameter Section -------------------------
Adjust the following parameter of the script:
- Start frame of the animation: FRAME_START
- End frame of the animation: FRAME_END
-
Number of parallel tasks: NUM_TASKS
- NUM_TASKS=number, e.g. NUM_TASKS=5
- NUM_TASKS=auto: The number of tasks is automatically determined, according to the available memory (recommended)
- Name of your Python script/ParaView trace file: PARAVIEW_PYTHON_SCRIPT
Additional info:
- In ParaView, the numbering of animation frames starts at frame=0. For example, 500 timesteps: FRAME_START=0, FRAME_END=499
- You have to use an osmesa version of ParaView, that does not open any graphical interface
- The animation script creates a file animate.config. There, you can identify the start frame and end frame for each task
Resource allocation
- The scripts only work on 1 compute node, -N1. No support for multiple nodes
- Allocate a node with the option –exclusive, to get the complete memory
- In the slurm batch script, you have to adjust your account and allocation time
- Do not run any other program on the same node
Summary
- Record a ParaView trace file/Python script, e.g. animation.py
- Download the animation script, e.g. make_paraview_animation.sh
- Adjust the parameter of the animation script (frame numbers and name of the Python script)
- Create an interactive session, e.g. interactive -N1 –exclusive –time=02:00:00
- Run the script: make_paraview_animation.sh
- Alternatively, submit the slurm batch script: sbatch make_paraview_animation_slurm.sh
 User Area