Berzelius Getting Started
- 1. Introduction
- 2. Getting Access to Berzelius
- 3. Log in to Berzelius
- 4. Data Storage on Berzelius
- 5. Data Transfer from/to Berzelius
- 6. Modules and Build Environment
- 7. System Status
- 8. User Support
- 9. Berzelius Research Projects and Showcase
- 10. Frequently Asked Questions
1. Introduction
Berzelius is an AI/ML-focused compute cluster composed of two main systems: Berzelius Ampere, an NVIDIA® SuperPOD with 94 DGX-A100 nodes and 8 CPU nodes, and Berzelius Hopper, which adds 16 DGX-H200 nodes and 8 CPU nodes. The interconnect fabric allows RDMA, non-blocking connection between all of these GPUs with a bandwidth of 200 GB/s and µs order latencies between any two endpoints. This makes several hundred (AI) petaflops available to individual jobs for certain workloads. Berzelius currently runs Red Hat Enterprise Linux release 8.8.
The Berzelius User Guides mainly consist of 5 parts:
- Berzelius Getting Started
- Berzelius Resource Allocation
- Berzelius Compute Node User Guide
- Berzelius Software Guide
- Berzelius Common Datasets
2. Getting Access to Berzelius
2.1 Berzelius Resource Allocation Policy
Berzelius resource is available to Swedish academic researchers as described in Project Applications and Resource Allocation on Berzelius.
2.2 Submitting Project Proposals in SUPR
Project applications are made in SUPR (Swedish User and Project Repository) in an application round called “LiU Berzelius 2026”, available via the menu drill down “Rounds” –> “Local and Special Rounds” –> “KAW” –> “LiU Berzelius 2026”. Membership of a project can be added or requested using the “Add Project Members” and “Request Membership in Project” functions in SUPR.
2.3 Getting a Login Account
To log in to Berzelius, you need a login account. Please refer to Getting a login account for how to get an account.
2.4 Acknowledgement
We kindly ask the acknowledgement of Berzelius and NSC in scientific publications that require the use of Berzelius resources, services or expertise. This helps us ensure continued funding and maintain service levels. Please see Acknowledgment suggestion for examples.
3. Log in to Berzelius
On Berzelius, there are two types of specialised nodes, each serving a different role in the computing workflow. The login process typically involves connecting from your local machine to one of the designated login nodes (e.g. berzelius1 or berzelius2 for Berzelius-Ampere), which then allows you to submit and manage jobs that run on the actual compute nodes.
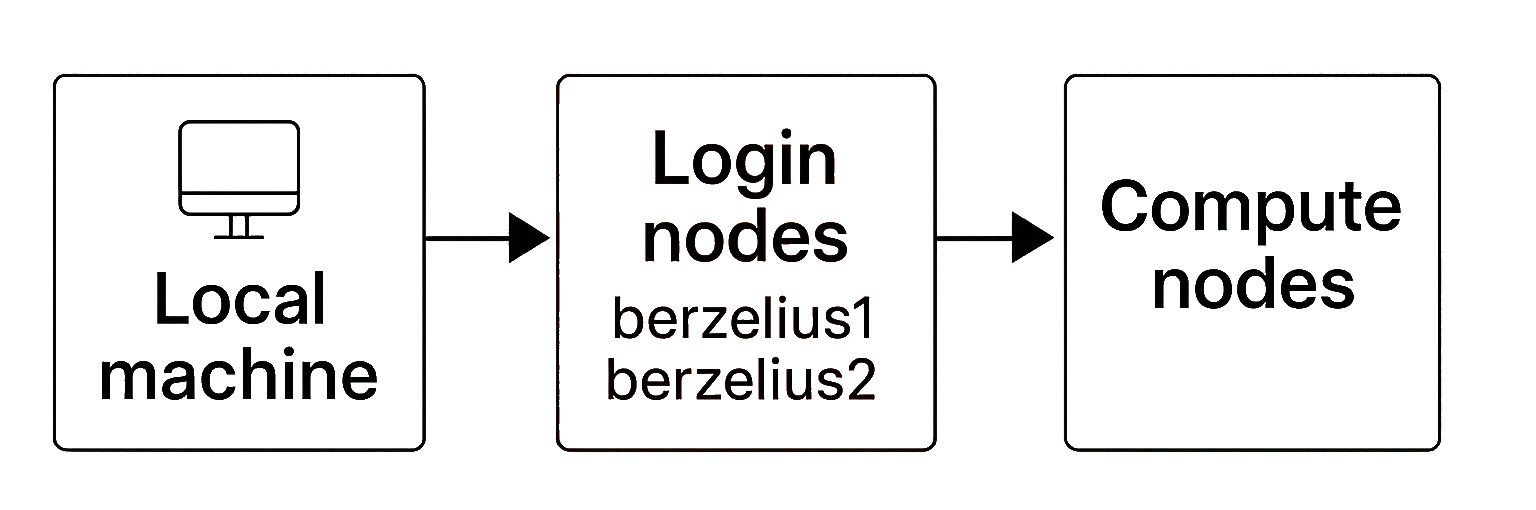
3.1 Login nodes
A login node is a server specifically designated for user access and interaction with the cluster. It serves as the entry point for users who want to submit jobs, access data, compile code, and perform other tasks related to HPC computing.
It’s important to note that the login node is typically not intended for computationally intensive tasks. The actual heavy computation is offloaded to the compute nodes, which are dedicated to running user jobs.
For Berzelius Ampere, the login nodes are berzelius1.nsc.liu.se and berzelius2.nsc.liu.se. You may also connect via berzelius.nsc.liu.se, which will automatically assign you to one of the two nodes.
For Berzelius Hopper, there are six login nodes numbered from 1 to 6 (berzelius-hopper[1-6].nsc.liu.se). The login nodes in Berzelius Hopper are Virtual Machines and have less resources per login node as compared to login nodes in Berzelius Ampere. Similar to Berzelius Ampere you may connect through berzelius-hopper.nsc.liu.se to be assigned automatically.
3.2 Compute nodes
Compute nodes are the workhorses of an HPC cluster. They are dedicated server nodes designed for executing computationally intensive tasks, simulations, data analysis, and other high-performance computing workloads. Compute nodes typically make up the bulk of the resources in an HPC cluster and are responsible for performing the actual computations requested by users.
These nodes on Berzelius Ampere are named node001 — node094 and node221 — node228.
| Node Type | Node Names | GPUs | CPUs | RAM | VRAM/GPU | Local SSD |
|---|---|---|---|---|---|---|
| Thin | node001 — node060 | 8 x NVIDIA A100 | 2 x AMD Epyc 7742 | 1 TB | 40 GB | 15 TB |
| Fat | node061 — node094 | 8 x NVIDIA A100 | 2 x AMD Epyc 7742 | 2 TB | 80 GB | 30 TB |
| CPU | node221 — node228 | — | 2 x AMD Epyc 9534 | 1.1 TB | — | 6.4 TB |
On Berzelius Hopper, the GPU compute nodes are named node101 — node116, and the CPU-only nodes are named node117 — node124.
| Node Type | Node Names | GPUs | CPUs | RAM | VRAM/GPU | Local SSD |
|---|---|---|---|---|---|---|
| GPU | node101 — node116 | 8 x NVIDIA H200 | 2 x Intel 8480C | 2.1 TB | 141 GB | 30 TB |
| CPU | node117 — node124 | — | 2 x AMD Epyc 9534 | 1.1 TB | — | 6.4 TB |
Please note that in case a project has allocation on both Berzelius-Ampere and Berzelius-Hopper, the the users can access A100 or H200 GPUs based on where they are submitting jobs (i.e. whether they are logged on Berzelius-Ampere or Berzelius-Hopper respectively). Also, there is no -C flag on Berzelius-Hopper as all nodes are identifical in Berzelius-Hopper.
3.3 Log in via SSH
Assuming you have received your Berzelius account credentials, you can use SSH (Secure Shell) to log in to the Berzelius login node from your local computer. You need to input the 2FA verification code after the password.
ssh <your username>@<login node>
SSH fingerprints for the login nodes in Berzelius Ampere are.
SHA256:T+pB0hRJv9RhlE8KlW9bCU5Zk22B9fHW2X65xjLhtLk (RSA)
SHA256:ZjS69kEb4xeK2a97awDqz0cu0zUwTRyaqL5w59tmty0 (ECDSA)
SHA256:iZLFlrmwW7YbMXsR7TQxlrDfHUbQnFg5tSfB4GNCtGQ (ED25519)
SSH fingerprints for the login nodes in Berzelius Hopper are.
SHA256:iAN8sc8L+1vN1V+Q2BENGYV4ZdikBmI+czclEw1s2sk (RSA)
SHA256:53+/mN5Kn8Dm52OoVDRCfpdx40BifIXky6Z8wo8XjV0 (ECDSA)
SHA256:uOAV28QYD1ZgZxx4KX+5oRUbUHBJLqxMSVTRJnW4RS4 (ED25519)
3.4 Log in via ThinLinc
ThinLinc is a remote desktop server software designed to provide secure and efficient remote access to Linux and UNIX desktop environments and applications. ThinLinc is the recommended way to run graphical applications on Berzelius. It provides a much better user experience for modern GUIs than X-forwarding. In addition, ThinLinc provides session management, allowing users to disconnect from the session while running processes are kept running.
The ThinLinc client is available free of charge and has packages available for the major OS platforms (Linux, MacOS and Windows). See Running graphical applications for more information.
On Berzelius Hopper ThinLinc log in is done via berzelius-hopper-thinlinc.nsc.liu.se which will load balance between the login nodes and manage sessions. On Berzelius Ampere ThinLinc log in can be done either via the high availability interface berzelius.nsc.liu.se or connecting dircetly to the login nodes berzelius1.nsc.liu.se and berzelius2.nsc.liu.se.
4. Data Storage on Berzelius
The shared storage and data transport fabric on Berzelius is very high performance, and should suffice for most IO loads on it, specifically data intensive AI/ML loads.
This is especially the case when the data sets are well formatted. Examples of good such formats are TFRecords (from TensorFlow), RecordIO (from MXNet) or Petastorm (Uber).
The use of datasets in these formats can greatly reduce IO-wait time on the GPU compared to raw file system access, and will also reduce load on the shared storage. NSC highly recommends that you store and use your data sets using some such format.
The data stored and used on Berzelius is covered by the Berzelius Storage Policy detailing fair use and data retention after projects have ended. In short, you should use Berzelius storage sensibly and take care of your results from Berzelius calculations in a timely manner. Also, do not use Berzelius for processing sensitive data (e.g. data subject to GDPR or similar).
4.1 Shared Storage
There are two shared storage areas set up for use:
- the home directory
/home/$USER, nightly backed-up and small (20 GB quota per user) - the project directory
/proj/<your_project_dir>/users/$USER
4.2 Node Local Storage
High-performance NVMe SSD node local storage is available on each compute node. Here are a few important points regarding the available node local storage:
- For every job, node local scratch space is mounted under
/scratch/local. - Separate jobs cannot access another job’s
/scratch/localwhen multiple jobs are sharing a node. - Each job’s
/scratch/localis erased between jobs. Data not saved (e.g. moved to somewhere under/proj) at the end of a job is lost and cannot be recovered. - If you plan to use it for your datasets, consider storing your dataset as uncompressed
tararchives, preferably split into multiple parts, and unpack them in parallel. This will significantly increase your data transfer speed compared to using a single process.
4.3 Efficient Dataset Transfer to Node Local Storage
There is occasionally a need to use node local storage under /scratch/local to avoid starving the GPUs of data, thereby improving the efficiency of your job. There may also be situations where your preferred framework or application cannot work efficiently with certain data formats, or when you need to reduce the number of files stored on the Berzelius shared storage by using archive formats, such as .tar. In such cases, transferring and unpacking the data to node local storage can help facilitate your work.
In these situations, an efficient and high-performing method for transferring data from shared project storage to local disk is essential to avoid excessive job startup times. This can be achieved using .tar archive files (or other archive formats) for your dataset, combined with parallel unpacking. On Berzelius, there are only two steps required to accomplish this:
- Partition and pack your dataset into multiple
.tararchives, balanced in terms of size and number of files. For performance reasons, it is important not to use compression here, as decompression can become a significant bottleneck during the unpacking process in the next step. - On an allocated compute node, unpack these multiple
.tarfiles using parallel threads directly to the local scratch disk.
Example: Transferring ImageNet-1k Training Dataset to Node Local Storage
In this example, we use the ImageNet-1k training dataset, which is 140 GB in size and contains approximately 1.28 million files. The performance figures reported below for this dataset should serve as a good indicator of the performance you can expect in your case if scaled appropriately.
- We first created tar archives of the ImageNet-1k training dataset using 8 parallel workers. The process finished in around 7 minutes. Test parameters for your own situation, and aim to find a reasonable number of
.tararchives based on your dataset.
module load Fpart/1.5.1-gcc-8.5.0
export DATA_DIR=/proj/common-datasets/ImageNet/ILSVRC2012_img_train
export DATA_TAR_DIR=/proj/nsc_testing/xuan/ImageNet-tars

time fpsync -n 8 -m tarify -s 2000M $DATA_DIR $DATA_TAR_DIR
real    7m7.536s
user    0m58.473s
sys     24m5.422s
- (Optional) To verify the data integrity of the
.tararchives, we generate an xxh64sum on the ImageNet-1k training dataset with relative paths.
export XXH64SUM_PATH=/proj/nsc_testing/xuan/imagenet_xxh64sum.txt
cd $DATA_DIR
find . -type f -print0 | xargs -0 -n 1 -P 16 xxh64sum | tee "$XXH64SUM_PATH" > /dev/null
We unpack the .tar archives and verify the unpacked files against the original checksums.
export DATA_TAR_UNPACKED_DIR=/proj/nsc_testing/xuan/ImageNet-tars-unpacked
ls $DATA_TAR_DIR/*.tar | xargs -n 1 -P 8 tar -x -C $DATA_TAR_UNPACKED_DIR -f

cd $DATA_TAR_UNPACKED_DIR
xxh64sum --quiet --check $XXH64SUM_PATH && echo "Verification SUCCESSFUL" || echo "Verification FAILED"
- On an allocated compute node, you can then unpack the archive files in parallel from shared storage to the node’s local disk using the command below.
time ls $DATA_TAR_DIR/*.tar | xargs -n 1 -P 8 tar -x -C /scratch/local/ -f
real    1m42.172s
user    0m7.409s
sys     8m13.967s
Depending on the size and number of files in the dataset .tar archives, as well as the workload of the file systems involved, you may experience some variation in unpacking times. On a compute node using the example dataset, we measured the following unpack times with different numbers of parallel workers:
| N | Time |
|---|---|
| 2 | 6m42.332s |
| 4 | 3m52.195s |
| 8 | 1m42.172s |
| 16 | 2m0.437s |
| 32 | 2m7.708s |
While it is, of course, possible to use other methods to transfer your dataset, we recommend this approach as it is highly efficient and “nice” to the shared file system. By managing fewer files, it conserves resources on the shared file system servers.
4.4 Quotas
Quotas and your current usage can be checked with the command nscquota.
The standard quota is as follows:
- The
/home/$USERdirectory: 20 GB, 1 million files. - The
/proj/your_project_dirdirectory: 2 TB, 2 million files.
The quota for the project directory can be increased, either at the time you apply for the project or as a complementary application at a later stage in SUPR.
Please consider using the datasets we host at /proj/common-datasets to avoid data duplication and save hard drive space. For a complete list of datasets available on Berzelius, please visit Berzelius Common Dataset.
5. Data Transfer from/to Berzelius
For data transfers between Berzelius and your local computer, please use scp or rsync. Other file transfer tools (e.g. FileZilla, WinSCP) using SCP or SFTP protocol
should likely work as well.
Always upload large datasets to your /proj directory and never to /home,
since the /home quota is only 20 GB, see Data Storage.
While both scp and rsync work, we recommend rsync for large or frequently updated datasets due to better performance and fault tolerance.
5.1 Transfer using the Command Line
- Transfer from your local computer to Berzelius
# To transfer a file
scp /your_local_dir/dataset.tar <your username>@berzelius1.nsc.liu.se:/proj/your_proj/users/username/
rsync -av /your_local_dir/dataset.tar <your username>@berzelius1.nsc.liu.se:/proj/your_proj/users/username/


# To transfer a directory
scp -r /your_local_dir/dataset <your username>@berzelius1.nsc.liu.se:/proj/your_proj/users/username/
rsync -av /your_local_dir/dataset <your username>@berzelius1.nsc.liu.se:/proj/your_proj/users/username/
- Transfer from Berzelius to your local computer
# To transfer a file
scp <your username>@berzelius1.nsc.liu.se:/proj/your_proj/users/username/results.tar /your_local_dir/
rsync -av <your username>@berzelius1.nsc.liu.se:/proj/your_proj/users/username/results.tar /your_local_dir/

# To transfer a directory
scp -r <your username>@berzelius1.nsc.liu.se:/proj/your_proj/users/username/results /your_local_dir/
rsync -av <your username>@berzelius1.nsc.liu.se:/proj/your_proj/users/username/results /your_local_dir/
5.2 Transfer using FileZilla
FileZilla is a popular open-source FTP (File Transfer Protocol), FTPS (FTP Secure), and SFTP (SSH File Transfer Protocol) client that allows you to transfer files between your local computer and remote servers. It provides a user-friendly graphical interface for managing file transfers and is available for Windows, macOS, and Linux. Please refer to the Filezilla User Guide
6. Modules and Build Environment
6.1 Modules
All software external to the RHEL OS is installed under the /software
directory, and are made conveniently available via the module system. You are very welcome to make feature requests via support, so that we
can customize the Berzelius user environment to be most effective for you.
- Check module availability
module avail - To load a module:
module load Miniforge3/24.7.1-2-hpc1-bdist - To remove a module:
module rm Miniforge3/24.7.1-2-hpc1-bdist
6.2 Build Environment
Build environments are
available via the modules for those who may need to build software for the RHEL 8
environment on Berzelius. For instance, if you need to build the
mpi4py Python package or CUDA dependent Python packages, have this module loaded when building.
A basic build environment includes: the GCC, CUDA, OpenMPI, OpenBLAS, FFTW and ScaLAPACK.
| Buildenv | GCC | CUDA | OpenMPI | OpenBLAS | FFTW | ScaLAPACK |
|---|---|---|---|---|---|---|
| buildenv-gcccuda/11.3-8.3.1-bare | 8.5.0 | 11.3.1 | 4.1.1 | 0.3.15 | 3.3.9 | 2.1.0 |
| buildenv-gcccuda/11.4-8.3.1-bare | 8.5.0 | 11.4.2 | 4.1.1 | 0.3.15 | 3.3.9 | 2.1.0 |
| buildenv-gcccuda/11.8.0-gcc11.3.0 | 11.3.0 | 11.8.0 | 4.1.4 | 0.3.20 | 3.3.10 | 2.2.0 |
| buildenv-gcccuda/12.1.1-gcc12.3.0 | 12.3.0 | 12.1.1 | 4.1.5 | 0.3.23 | 3.3.10 | 2.2.0 |
7. System Status
Please check Berzelius system status on this page. If something is not working, please don’t hesitate to contact us.
8. User Support
Mail any support issues to berzelius-support@nsc.liu.se or use the interface
available in SUPR. Please report the following information when you
encounter problems and obstacles:
- A general description of the problems
- Job IDs
- Error messages
- Commands to reproduce the error messages
Note: Please open one ticket per issue to help us track and resolve problems more efficiently.
The support mail address is also the interface to make feature requests to add to Berzelius, and we also have the possibility to bring in the Berzelius vendor Atos or NVIDIA, should there be issues where extra support is needed.
9. Berzelius Research Projects and Showcase
Berzelius hosts research projects in many different fields.
Please read the Showcase of a few groundbreaking research projects currently taking advantage of Berzelius high performance computing resources. If you are a Berzelius user and want your research to be featured on our website, please contact berzelius-support@nsc.liu.se and we’ll be happy to have you.
10. Frequently Asked Questions
Here is an FAQ page for common questions.
Our FAQ is a collaborative effort. If you have a question that you believe should be included in our FAQ, or if you’d like to contribute an answer, please contact us. We value your input and are dedicated to making this resource as helpful as possible.
- Berzelius FAQ
A FAQ page on Berzelius
- Berzelius Research Projects
Research projects on Berzelius
- Berzelius Research Showcase
Research showcase on Berzelius
 User Area